
Special Asset Types
Logical Assets
Non-physical assets which cannot be observed in the facility, for example 'Escape Route', 'Exchanger Pulling Bundle', 'Safety Zone'.
There is currently no specific behavior associated with a logical asset but its physical representation does not contribute to QA Verify functions.
Temporary Assets
Physical Assets which can be observed in the facility but may not always be present, for example, construction and maintenance equipment and facilities like Cranes, Scaffolding etc.
Temporary assets have an inherent General attribute 'Active' which can be set to 'True/False' by the user or Macro based on for example a construction or maintenance schedule. The user can instruct the viewer to not display temporary assets which are not active.
To show or hide temporary assets, use the asset view's "Show Temporary" option.
From the Asset View Toolbar
- Make sure the "Show Temporary" button is on the toolbar, (see Asset Window Toolbar for more information).
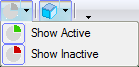
 - click the toolbar button to toggle the view of all temporary assets or use the pull down arrow to only show/hide active/inactive temporary assets.
From the Asset View context menu
- Make sure nothing is selected.
- Right click in the asset view to display the context menu.
- Select the "Show Temporary" menu item to toggle the view of all temporary assets or use the pop up menu to only show/hide active/inactive temporary assets.
Image Asset
A special type of asset allowing the user to display, scale and locate an image, typically used to display a plot plan image or satellite image of the facility beneath the 3D model.
Creating a new image asset is done in three basic steps:
- Create the image asset.
- Use the image asset's properties dialog to associate an image file (jpg, tif, etc.) to the image asset. Associating an image also sets the initial dimensions of the image asset (Width and Length).
- Further position and scale the Image Asset so that it matches the 3D model.
- Using the image asset's physical properties and manually entering the Width, Length, Position, Direction and Orientation properties.
- Using the Manipulate function and the Universal manipulator.