
Sharing Assets
|
Authoring functions, including sharing assets, are always performed against a work order or a standing task, and always in a Work In Progress (or WIP) view. If you are working in a work order or standing task with a scope that allows creating assets, then you can share assets |

Assets may be shared from one workspace to another. Sharing an asset from one workspace to another allows users of the source workspace to maintain control of the asset while allowing users of other workspaces access to the asset. It also ensures consistency since the same asset is used in multiple places, and changes made in one workspace will be reflected in all others.
How to share Assets
The following applies when sharing assets:
- A user must be assigned to a role that has the "Allow Sharing Into" Access Right in order to be able to share into another workspace. In the example below, the user belongs to a role that has the "Allow Sharing Into" Access Right for the "Inspection" workspace.
- The template of the asset being shared must have a valid parent in the source workspace. In the example below, the "Equipment" Template has "Circuit" as its parent.
- There is no limit to the number of workspaces an asset can be shared into.
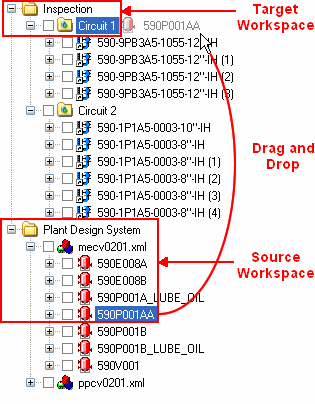
To share an asset, drag and drop the asset from the source workspace to the target workspace.
|
|
Find an asset in the target workspace. |
|
|
You can also use macros to share multiple assets based on their attributes. |

Shared Asset behavior
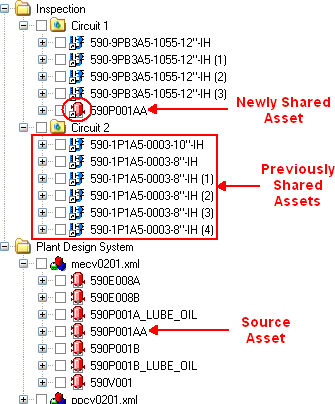
Shared Assets are denoted by the  icon, which appears both in the Asset Explorer and in the Asset's properties dialog.
Users can perform the following actions on an asset once it has been shared:
- Users with access to a shared asset can view all the properties of the asset. In the example below, users of the "Inspection" workspace may display and view the properties of the assets with the
 icon. However, they can not change any asset properties.
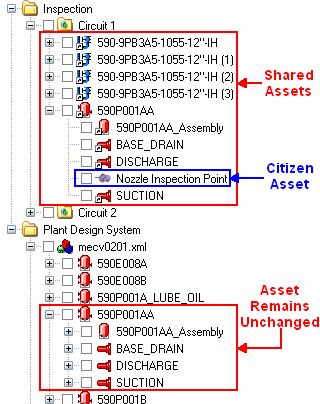
 - Users with access to a shared asset cannot remove any of the children within their own workspace. In the example below, users of the "Inspection" Workspace cannot delete any of the children of the "590P001AA" shared asset, except for "Nozzle Inspection Point", which resides in the "Inspection" Workspace.
- Users with access to a shared asset can change the appearance within their own workspace. The appearance in the source workspace will remain unchanged. In the example below, if a user of the "Inspection" workspace changes the appearance of the "590P001AA" shared asset, users of the "Plant Design System" workspace will be unaffected.
- Any changes to the asset in the source workspace, including children, will be immediately available to all workspaces where the asset is shared. This includes adding or removing children or deleting the asset itself. In the example below, if a user of the "Plant Design System" workspace changed any attributes or removed any of the children of "590P001AA", users of the "Inspection" Workspace would immediately see these changes.
- Users with access to a shared Asset may add children within their own workspace, i.e. the children will not appear in the source workspace. This is specially important if users want to add their own marked points and Labels. In the example below, users of the "Inspection" Workspace have added a Marked Point to the "590P001AA" shared Asset, however, users of the "Plant Design System" Workspace remain unaffected.
Finding Shared Assets and Target Assets
Once an asset is shared, it can be beneficial to access the target asset in its native workspace. To do so, select a shared asset and use the Find Target Asset command from the context menu. Similarly, if you have an asset in its native workspace, you can find all of the shared assets that point back to it using the Find Shared Assets command from the context menu.